這是一個不錯的想法... ( 你怎么知道的?)
這里我只寫貝殼物聯子設備的使用和“kaiguan.lua"的具體代碼
詳細教程比如使用的軟件啊下載操作啊還有"init.lua" 我就不貼出來了,都一樣的。不會的看參考教程
參考鏈接
http://www.eqytg.org/help/20.html
https://blog.csdn.net/qq_33508087/article/details/82925995
http://www.eqytg.org/talk/927.html
萌新看這三篇夠了
老司機直接開始
開始
1. 添加設備
DK.png) 2. 點擊編輯并將設備類型設置為萬能遙控器保存
2. 點擊編輯并將設備類型設置為萬能遙控器保存
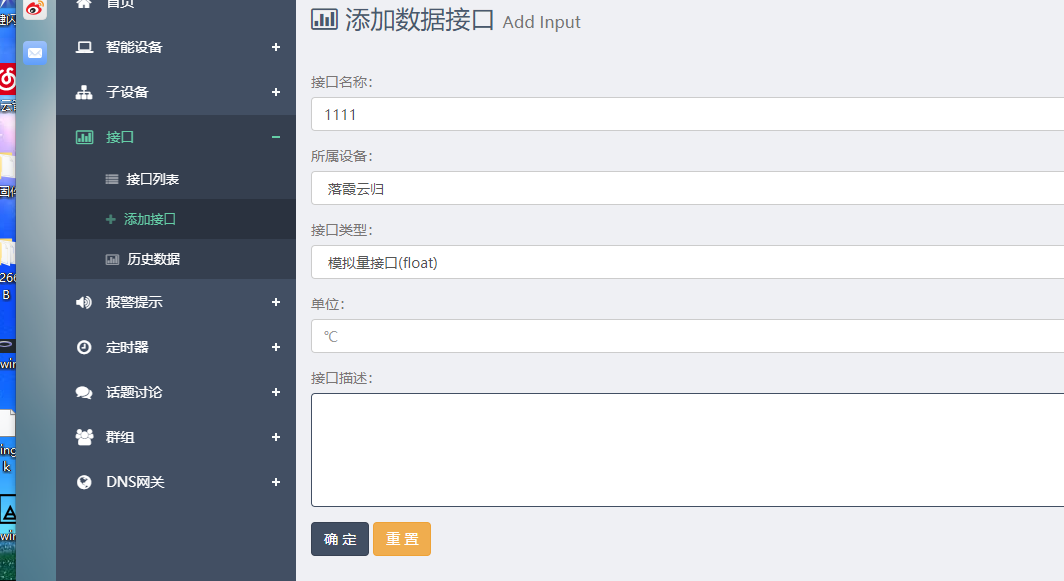
%40%40%602%251%7D56(N5Y.png) 3. 添加接口 保存
3. 添加接口 保存
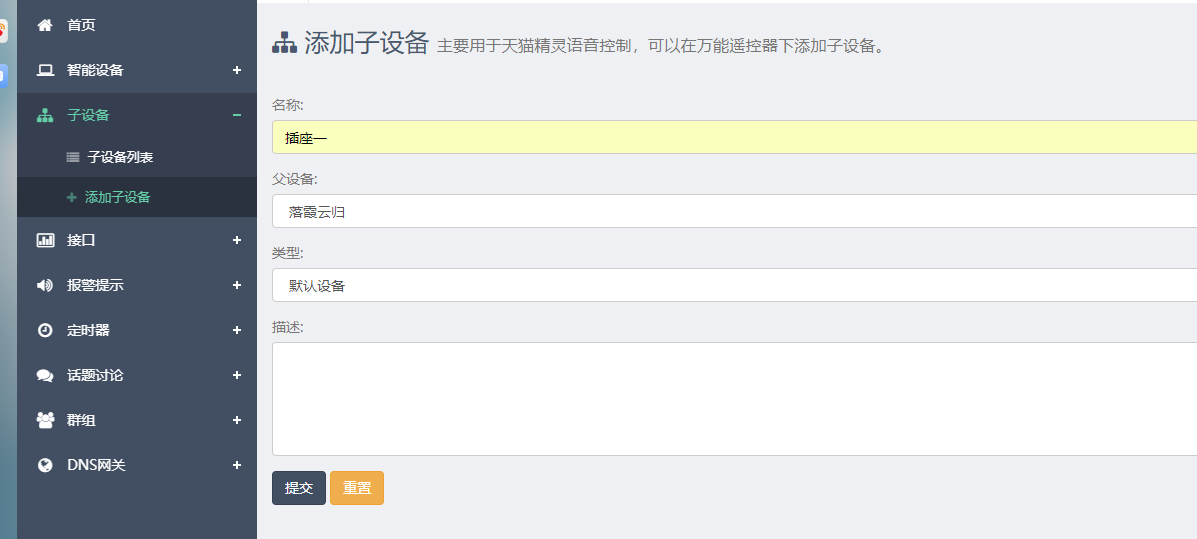
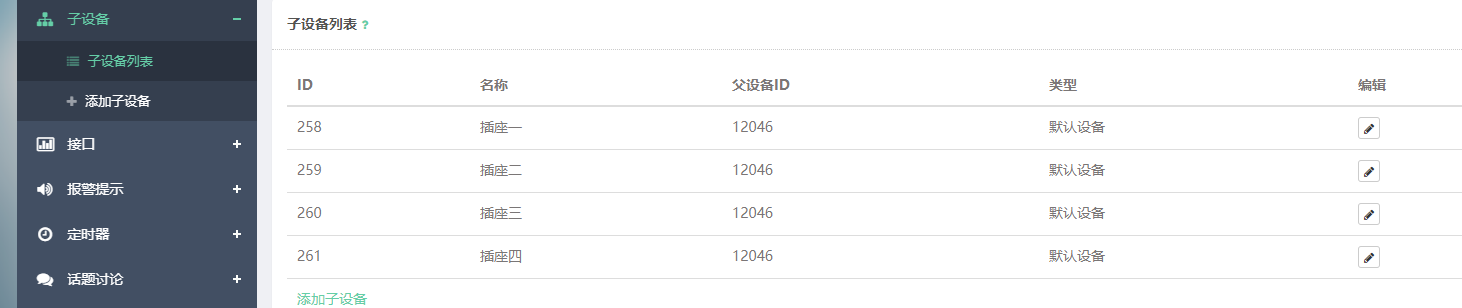
 4.添加子設備 要添加四個(當然你要控制幾路就添加幾個),注意父設備的一致 保存
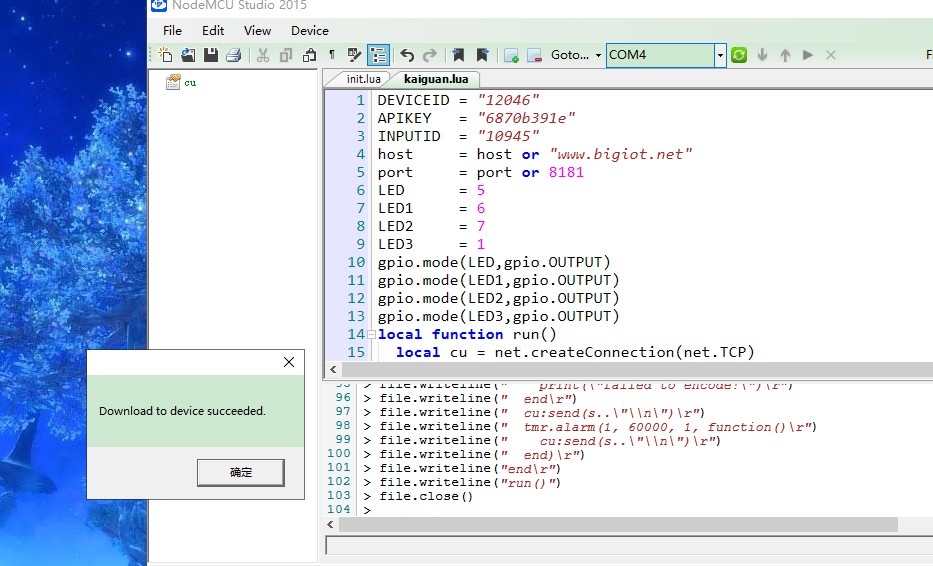
 5. OK 接下來打開 "kaiguan.lua" 把里面的代碼全刪了, 把下面的代碼復制上去。
DEVICEID = "12046"
APIKEY   = "6870b391e"
INPUTID  = "10945"
host     = host or "www.eqytg.org"
port     = port or 8181
LED      = 5
LED1     = 6
LED2     = 7
LED3     = 1
gpio.mode(LED,gpio.OUTPUT)
gpio.mode(LED1,gpio.OUTPUT)
gpio.mode(LED2,gpio.OUTPUT)
gpio.mode(LED3,gpio.OUTPUT)
local function run()
  local cu = net.createConnection(net.TCP)
  cu:on("receive", function(cu, c)
    print(c)
    r = cjson.decode(c)
    if r.M == "say" then
        if r.C == "play" and r.S =="D258" or r.C == "play1" then
        gpio.write(LED, gpio.HIGH)
        ok, played = pcall(cjson.encode, {M="say",ID=r.ID,C="LED turn on!"})
        cu:send( played.."\n" )
      end
    if r.C == "play" and r.S =="D259" or r.C == "play2" then
          gpio.write(LED1, gpio.HIGH)
          ok, played = pcall(cjson.encode, {M="say",ID=r.ID,C="LED1 turn on!"})
        cu:send( played.."\n" )
      end
    if r.C == "play" and r.S =="D260" or r.C == "play3" then
        gpio.write(LED2, gpio.HIGH)
          ok, played = pcall(cjson.encode, {M="say",ID=r.ID,C="LED2 turn on!"})
        cu:send( played.."\n" )
      end
    if r.C == "play" and r.S =="D261" or r.C == "play4" then
         gpio.write(LED3, gpio.HIGH)
         ok, played = pcall(cjson.encode, {M="say",ID=r.ID,C="LED3 turn on!"})
        cu:send( played.."\n" )
      end
    if r.C == "stop" and r.S =="D258" or r.C == "stop1" then
        gpio.write(LED, gpio.LOW)
        ok, stoped = pcall(cjson.encode, {M="say",ID=r.ID,C="LED turn off!"})
        cu:send( stoped.."\n" )
      end
    if r.C == "stop" and r.S =="D259" or r.C == "stop2" then
          gpio.write(LED1, gpio.LOW)
          ok, stoped = pcall(cjson.encode, {M="say",ID=r.ID,C="LED1 turn off!"})
        cu:send( stoped.."\n" )
      end
    if r.C == "stop" and r.S =="D260" or r.C == "stop3" then
        gpio.write(LED2, gpio.LOW)
          ok, stoped = pcall(cjson.encode, {M="say",ID=r.ID,C="LED2 turn off!"})
        cu:send( stoped.."\n" )
      end
    if r.C == "stop" and r.S =="D261" or r.C == "stop4" then
        gpio.write(LED3, gpio.LOW)
        ok, stoped = pcall(cjson.encode, {M="say",ID=r.ID,C="LED3 turn off!"})
        cu:send( stoped.."\n" )
      end
    end
  end)
  cu:on('disconnection',function(scu)
    cu = nil
    --停止心跳包發送定時器,5秒后重試
    tmr.stop(1)
    tmr.alarm(6, 5000, 0, run)
  end)
  cu:connect(port, host)
  ok, s = pcall(cjson.encode, {M="checkin",ID=DEVICEID,K=APIKEY})
  if ok then
    print(s)
  else
    print("failed to encode!")
  end
  cu:send(s.."\n")
  tmr.alarm(1, 60000, 1, function()
    cu:send(s.."\n")
  end)
end
run()
6.修改代碼
代碼前三行寫你的 (LED 5 6 7 1 對應 ESP8266的 12 13 14 5 引腳 ,懂的自行修改)
將 “ if r.C == "play" and r.S =="D258" or r.C == "play1" then ”里的258修改為你的子設備ID 我的對應插座一
一樣其余三個對應你的子設備ID修改
if r.C == "stop" and r.S =="D258" or r.C == "stop1" then 這個關的同理 也改好
7.改好 并下載到 ESP8266
8.復位或重啟 去貝殼物聯設備列表刷新看看設備有沒有上線 (要好一會才能刷新出來)
好吧 我這個號被禁止登錄 沒圖了
----------------------------------------------------------------------
上線了試一下 設備對話--發送命令 play1 如果有返回數據就是正常了
9.天貓精靈綁定貝殼物聯 并刷新 看到四個插座后 就可以讓貓精獨立控制ESP 四路繼電器了(可以用萬用表測一下ESP 12 13 14 5 腳的電平)
因為是我的小號 所以不打碼了 好讓你們看清我的思路 這是重點 如果沒有成功就看代碼了解我的思路自己改去
 我需要經驗+1 我的子設備不夠用沒法繼續折騰了
 看完了回復一下吧我需要經驗+1
評論:共34條
貝殼物聯 評論于:2019-07-13
19:05:12
多謝分享。
不磊哥 評論于:2019-07-13
22:32:59
原來如此,確實學到了
未來加油 評論于:2019-07-13
22:38:31
還有很多功能等大師們挖掘啊。按鍵那里程序不知道怎么寫,就是使用一個按鍵控制開和關的功能,并同步返回。
1197994757
回復于:2019-07-14 15:18:38
回復 @未來加油:這個需要貝殼物聯支持才行
未來加油
回復于:2019-07-15 11:52:28
回復 @1197994757:很多東西都是支持的。貝殼只要負責一個數據。還是可以從程序上下手做的。
1197994757 評論于:2019-07-15
21:03:02
可以參考其他東西的按鍵代碼
17614713123 評論于:2019-07-17
19:45:48
我為什么下載進去就能控制一路
1197994757
回復于:2019-07-17 20:38:03
回復 @17614713123:那一路能控制呢?
貝殼物聯
回復于:2019-08-09 16:15:27
回復 @17614713123:父設備設置為萬能遙控器,才能加載出下面的子設備
17614713123
回復于:2019-08-09 19:56:46
回復 @貝殼物聯:好的謝謝
蚌埠老梁 評論于:2019-07-18
22:03:09
貌似你是第一個教程控制子設備的 感謝分享
zhutr99 評論于:2019-08-08
10:58:51
現在好像天貓精靈不能添加子設備了,只認得主設備,天貓精靈發過來的代碼也不像能支持子設備的樣子,網絡接收:{"M":"say","ID":"U8696","C":"play","SIGN":"Aligenie","T":"1565232966"}
有人能解決咩,我是用STM32加ESP8266透傳實現的
有人能解決咩,我是用STM32加ESP8266透傳實現的
zhutr99 評論于:2019-08-08
11:01:19
感覺像是貝殼平臺不支持了,花了三天時間剛實現,難道又要轉戰阿里云平臺嗎???
貝殼物聯
回復于:2019-08-09 16:14:40
回復 @zhutr99:父設備的設備類型設置為 萬能遙控器,才會顯示出子設備。
zhutr99 評論于:2019-08-12
16:01:29
十分感謝,已經在QQ上看到回復并實現了子設備了
銅cj 評論于:2019-08-26
16:33:14
ESP8266 lua開發 GPIO操作詳解
http://www.51hei.com/bbs/dpj-140394-1.html
(出處: 單片機論壇)
GPIO 對應的數字。(參照 來自黑51論壇里面的大神)
http://www.51hei.com/bbs/dpj-140394-1.html
(出處: 單片機論壇)
GPIO 對應的數字。(參照 來自黑51論壇里面的大神)
17806253798 評論于:2019-09-12
20:47:56
LED 5 6 7 1 為什么對應 ESP8266的 12 13 14 5 引腳?
我這么接的燈沒有反應?
我這么接的燈沒有反應?
1197994757
回復于:2019-09-12 22:47:52
回復 @17806253798:測一下電平是否有變化
ASUS124 評論于:2019-09-25
17:12:05
這個是單獨控制的還是一起控制的,還有play2~4這個對應手機遙控那個鍵?本人小白,剛進來1天
Brant 評論于:2019-10-07
23:30:14
學習了,非常感謝
unison 評論于:2019-10-13
02:09:16
只能單路控制嗎,有什么辦法能雙路控制,也可以關閉它
公元0001 評論于:2019-11-12
16:51:20
鏈接wifi的程序要自己加上去嗎
公元0001 評論于:2019-11-20
14:09:57
掉線怎么自動重連
1197994757
回復于:2020-04-11 11:52:40
回復 @公元0001:關于掉線重連 最后那幾行代碼改成這樣 如果你家網像我一樣每24小時斷線一次可以設置路由器自動重撥 +定時重啟
cu:on('disconnection',function(scu)
--停止心跳包發送定時器,5秒后重試
tmr.delay(60000)
node.restart()--暴力重啟
end)
cu:connect(port, host)
ok, s = pcall(cjson.encode, {M="checkin",ID=DEVICEID,K=APIKEY})
if ok then
print(s)
else
print("failed to encode!")
end
cu:send(s.."\n")
tmr.alarm(1, 40000, 1, function()
cu:send(s.."\n")
end)
end
run()
jayshitou 評論于:2019-11-22
20:58:48
掉線怎么自動重連+1
1197994757
回復于:2020-04-11 11:52:28
回復 @jayshitou:關于掉線重連 最后那幾行代碼改成這樣 如果你家網像我一樣每24小時斷線一次可以設置路由器自動重撥 +定時重啟
cu:on('disconnection',function(scu)
--停止心跳包發送定時器,5秒后重試
tmr.delay(60000)
node.restart()--暴力重啟
end)
cu:connect(port, host)
ok, s = pcall(cjson.encode, {M="checkin",ID=DEVICEID,K=APIKEY})
if ok then
print(s)
else
print("failed to encode!")
end
cu:send(s.."\n")
tmr.alarm(1, 40000, 1, function()
cu:send(s.."\n")
end)
end
run()
njzc0232 評論于:2020-01-06
17:07:21
掉線怎么自動重連
njzc0232 評論于:2020-01-06
17:08:05
掉線怎么自動重連
njzc0232 評論于:2020-01-06
17:10:43
掉線怎么自動重連
1197994757
回復于:2020-04-11 11:52:13
回復 @njzc0232:關于掉線重連 最后那幾行代碼改成這樣 如果你家網像我一樣每24小時斷線一次可以設置路由器自動重撥 +定時重啟
cu:on('disconnection',function(scu)
--停止心跳包發送定時器,5秒后重試
tmr.delay(60000)
node.restart()--暴力重啟
end)
cu:connect(port, host)
ok, s = pcall(cjson.encode, {M="checkin",ID=DEVICEID,K=APIKEY})
if ok then
print(s)
else
print("failed to encode!")
end
cu:send(s.."\n")
tmr.alarm(1, 40000, 1, function()
cu:send(s.."\n")
end)
end
run()
shuxiansheng 評論于:2020-03-03
21:06:00
cjson沒有定制
E-niu 評論于:2020-12-16
00:22:07
子設備如何在小程序內控制呢
deng 評論于:2020-12-20
14:17:52
做成功的,能否教授一下,我照著搬過來,最終實現不了,還有哪里要改的嗎?求加969439474
deng 評論于:2020-12-20
18:35:47
搬過去后一直在重連